This post may contain affiliate links. Please read my disclosure policy.
This roasted sweet potato and arugula salad recipe features some of my favorite fall flavors and always tastes so delicious this time of year.
Things are finally (fi-na-lly!) cooling off here in Barcelona this week after the summer’s unrelenting heat wave, which of course instantly has me craving all of my nostalgic fall faves…including this yummy roasted sweet potato and arugula salad. ♡
It’s a simple one that you could easily make anytime of year. But the combination of roasted potatoes, tart dried cranberries and toasted pecans always feels so quintessentially “fall” to me. And when combined with fresh peppery arugula, creamy avocado, tangy goat cheese (or whatever cheese you love best), and a zippy lemon dressing, this salad hits the perfect balance between cozy and hearty yet still fresh and light, which feels just perfect for these sometimes-warm, sometimes-cool days we’re enjoying right now as we move into the new season ahead.
Here in our house, we most often serve this as an entrée salad, but it would also make a lovely side dish for a dinner or holiday meal if you’d like. And if you feel like adding in an extra protein, some grilled chicken or bacon would be delicious mixed in too.
Let’s make some salad together!
Favorite Fall Salad Ingredients
To make this delicious roasted sweet potato and arugula salad, you will need:
Sweet potatoes: You’re welcome to peel or leave these unpeeled. We’ll then dice them into 1/2-inch cubes, toss with olive oil, season generously with salt and pepper, and roast until tender.
Greens: I’m partial to the peppery flavor of fresh arugula in this salad, but you could also use baby kale (or other varieties of kale), baby spinach, or any other salad greens that you prefer.
Avocado: Feel free to dice or thinly slice the avocado, which adds a lovely creaminess to the salad.
Crumbled cheese: I love the tart and tangy flavor of goat cheese in this salad, but feta, blue, cheddar, or Manchego cheese would be delicious alternatives too.
Nuts: Just about any of your favorite nuts or seeds will work well in this salad — pecans, walnuts, almonds, pepitas, you choose!
Dried berries: Dried cranberries always feel so quintessentially fall-ish to me, but dried cherries, raisins or even apricots would work well too.
Dressing: My everyday salad dressing goes beautifully with this salad, made with a quick blend of olive oil, lemon juice, Dijon, garlic, salt and pepper.
Recipe Variations
There are so many delicious ways that you can customize this fall salad recipe, so please feel free to make it your own! For example, you are welcome to…
Add a protein: Cooked chicken, bacon, steak, shrimp or tofu would be delicious mixed in here.
Add other mix-ins: Extra roasted veggies (such as beets, butternut squash, carrots, fennel, green beans or pumpkin), extra fresh veggies (bell pepper, radishes, red onion), rice or grains (quinoa, farro, wild rice), beans, olives, or sun-dried tomatoes would be other fun options for mix-ins.
Use a different dressing: I also love making this salad with my dreamy tahini dressing for a different spin on the recipe.
Make it vegan: Swap your favorite vegan cheese in place of goat cheese, or omit the cheese altogether and add in a sprinkle of nutritional yeast.
More Favorite Salad Recipes
Looking for more green salad recipes to enjoy this season? Here are a few of my faves:
This Favorite Fall Salad recipe is made with the most delicious collection of vibrant, seasonal, simple ingredients.
Salad Ingredients:
1 tablespoon olive oil
2 medium sweet potatoes, peeled and diced into 1/2-inch cubes
fine sea salt and freshly-ground black pepper
5 ounces arugula or baby kale
1 avocado, thinly sliced
1/2 cup crumbled goat cheese (or feta or blue cheese)
1/2 cup chopped pecans, lightly toasted
1/3 cup dried cranberries
Dressing Ingredients:
3 tablespoons olive oil
1 tablespoon freshly-squeezed lemon juice
1 teaspoon Dijon mustard
1 small clove garlic, pressed or minced
1/2 teaspoon fine sea salt
1/4 teaspoon freshly-cracked black pepper
To Make The Dressing: Whisk all ingredients together in a bowl (or shake together in a mason jar) until combined. Use immediately or refrigerate in a sealed container for up to 3 days.
To Roast The Potatoes: Heat oven to 400°F. Spread the diced sweet potatoes out on a medium baking sheet. Drizzle with the olive oil, and toss until the sweet potatoes are evenly coated. Season the sweet potatoes generously with salt and pepper. Then bake for about 30 minutes, or until the potatoes are tender and lightly browned/caramelized around the edges.. Remove from the oven and set aside.
To Assemble The Salad: Once the sweet potatoes are ready to go, add them to a large serving bowl along with the arugula, avocado, goat cheese, nuts and cranberries. Drizzle with the dressing, and toss until combined. Serve immediately and enjoy!
This Lemony Hearts of Palm and Avocado Salad is a fast and easy side salad recipe or make it a main dish with your favorite protein.
Hearts of Palm Salad with Avocado
I grew up eating hearts of palm right out of the can, so adding them to salads is nothing new to me. They have a slightly nutty flavor similar to artichoke hearts, with a creamy and crunchy texture. They combine perfectly with lemon, arugula, and avocado. If you’re new to hearts of palm, they are sold in a jar or can at the supermarket, and they even come in noodle form, which I used in this Hearts of Palm Noodle Peanut Stir Fry. Make it a meal with protein like chicken breast, shrimp, air fryer roasted chickpeas or salmon.
Can you eat hearts of palm raw?
Hearts of palm are ready to eat straight out of the can. You do not need to cook them.
What is hearts of palm salad made of?
This lemony hearts of palm salad has six main ingredients, plus olive oil, salt, and pepper. It’s a versatile recipe, so feel free to add whatever veggies you have on hand, like cucumber, bell pepper, or shaved carrots.
Red onion: Season sliced red onion with salt. You can also swap it for shallot.
Avocado: You’ll need one medium avocado.
Tomato: I used an heirloom tomato, but any kind would work – even cherry or grape tomatoes.
Hearts of Palm: Slice one cup of hearts of palm on an angle.
Arugula: If you’re not a fan of arugula, substitute mixed greens or watercress.
Hearts of Palm Salad Dressing: Drizzle lemon juice, olive oil, salt, and black pepper over the tomatoes, onions, and hearts of palm.
Your comments are helpful! If you’ve tried this healthy Lemony Hearts of Palm Recipe or any other on Skinnytaste, don’t forget to rate the recipe and leave me a comment below. And if you took a photo or video, share it with me on Instagram or Tiktok!
Lemony Hearts of Palm and Avocado Salad
4+
145Cals 2.5Protein 8Carbs 12.5Fats
Prep Time: 10mins
Cook Time: 0mins
Total Time: 10mins
This Lemony Hearts of Palm and Avocado Salad is a fast and easy side salad recipe or make it a main dish with your favorite protein.
5ouncesavocado, from 1 medium haas sliced
1/4cupred onion, sliced lengthwise
1heirloom tomato, sliced into thin wedges
1cupsliced hearts of palm, , sliced 1/4 inch thick on an angle, from 14 ounce can
1/2teaspoonkosher salt
2tablespoonsextra virgin olive oil
2tablespoonsfresh lemon juice
4cupsbaby arugula
Place onions in a medium bowl, season with 1/4 teaspoon Kosher salt, set aside while you prep the remaining ingredients.
Add the hearts of palm and tomato to the onions, add fresh 2 tablespoons fresh lemon juice, drizzle with 2 tablespoons extra virgin olive oil, 1/4 teaspoon salt and fresh black pepper.
Place arugula in a large salad bowl, and arrange the avocado.
Pour everything over the salad and serve right away, toss before serving.
15 Minute Green Goddess Salad Recipe filled with crisp green lettuce, cucumber, tomato, avocado green pepper and sunflower seeds then topped with creamy green goddess dressing for the perfect bite.
With the right combination of fresh ingredients and a stellar dressing to tie everything together, salads are my kind of comfort food. Not only do they deliver on both flavor and texture, but they also leave you feeling lively and refreshed. This quick and easy dish is destined to join the ranks of your top favorite salad recipes!
Vibrant green vegetables give this salad its signature color while the tomato, red onion and sunflower seeds sprinkle in some nice variation. The dressing coats each component with a lightweight layer of tangy, herby, garlicky goodness. It all comes together to form heaven in a serving bowl! Nothing beats a big bite that combines a little bit of everything.
Why Is it Called Green Goddess Salad?
I honestly couldn’t envision a more fitting name for this dish – it contains a lot of green and it tastes divine enough for a goddess! However, there’s actually another reason why this salad was given its name.
The dish was first created to be served as a starter for the lead actor of a play called “The Green Goddess.” Ever since it was brought to life at the Palace Hotel in 1923, different adaptations of green goddess salad have been composed in kitchens across the world. I’ve personally tried a bunch of different versions, and this one is the best of the best!
What You’ll Need
Let’s go over the good-for-you ingredients that make up this tempting salad. The amounts are included in the recipe card below this post.
Green Leaf Lettuce: Roughly chopped.
Diced Green Pepper
Diced English Cucumber
Halved Cherry Tomatoes: If preferred, you can swap these out for halved grape tomatoes.
Diced Red Onion
Sunflower Seeds: Stick with the unsalted ones to avoid adding unnecessary sodium – the salad dressing will provide plenty of flavor.
Sliced Avocado
Green Goddess Dressing: I highly recommend whipping up my light and creamy homemade version rather than buying it bottled!
How to Make Green Goddess Salad
Get ready to fall in love with the convenience of this recipe. You’ll have a wholesome salad on the table in no time!
Combine Everything But Avocado & Dressing: Add the prepared lettuce, green pepper, cucumber, red onion, cherry tomatoes and sunflower seeds to a large mixing bowl.
Toss With Dressing: Drizzle the green goddess dressing over the salad ingredients. Use two wooden spoons to toss the salad until everything is evenly coated.
Add Avocado & Serve: Top the salad with the sliced avocado, then serve it immediately.
Tips and Tricks
Check out the helpful hints below to ensure the success of your salad.
Make the Dressing in Advance: Making your salad dressing a few hours or even a day ahead of time allows the flavors to fuse together, giving you an even yummier end result. Keep it in an airtight container in the fridge until you’re ready to use it.
Use a Large Mixing Bowl: It’s important that everything is evenly coated in dressing so that every inch of your salad is packed with flavor. Grab the biggest mixing bowl you can find so you won’t have to worry about spillage slowing you down.
Serve the Salad Immediately: If you’re not serving all 6 helpings of this salad at once, I recommend serving the dressing on the side or tossing it with individual portions. Leftovers will last longer if the dressing and the salad ingredients are stored separately.
Variation Ideas
Green goddess salad doesn’t come with a strict formula – it’s super flexible! Here are some worthwhile ways to switch it up every so often:
Bulk It Up: Cooked chicken and crumbled feta cheese would taste incredible in this salad. Try it out if you’re looking to serve a substantial main course.
Swap Out the Greens: Not a fan of green leaf lettuce? Substitute it for another kind of lettuce or the salad greens of your choice (such as spinach, arugula or kale).
Crank Up the Heat: If you’re looking for a spicy version of this salad, then go ahead and blend a jalapeño into the dressing. Alternatively, dice it up and mix it into the salad, removing the seeds if desired.
Make the TikTok Version: Green goddess salad has recently gone viral on TikTok, only the internet sensation is more of a chopped salad that’s served as a dip. To mimic that trendy adaptation, leave out the tomatoes and make sure everything is diced up nice and finely, including the avocado. Toss the salad as usual, working gently to avoid smooshing the avocado, then serve it with your favorite pita or tortilla chips for dunking.
Keep leftover green goddess dressing chilled in an airtight jar and refrigerate any extra salad ingredients in a separate airtight container. The salad will last for up to 24 hours and the dressing will stay good for 5 days. Note that neither one is suitable for freezing.
15 Minute Green Goddess Salad Recipe filled with crisp green lettuce, cucumber, tomato, avocado green pepper and sunflower seeds then topped with creamy green goddess dressing for the perfect bite.
To a large bowl, add lettuce, green pepper, cucumber, red onion, cherry tomato and sunflower seeds.
Drizzle with green goddess dressing. Toss with two wooden spoons to coat everything.
Top with sliced avocado and serve.
Notes
Keep leftover green goddess dressing chilled in an airtight jar and refrigerate any extra salad ingredients in a separate airtight container. The salad will last for up to 24 hours and the dressing will stay good for 5 days. Note that neither one is suitable for freezing.
Nutrition
Serving Size:2 cups
Calories:250
Sugar:6 g
Sodium:390 mg
Fat:15 g
Saturated Fat:3 g
Carbohydrates:17 g
Fiber:6 g
Protein:10 g
Cholesterol:6 mg
Keywords: green salad with dressing, green goddess salad dressing, healthy salad
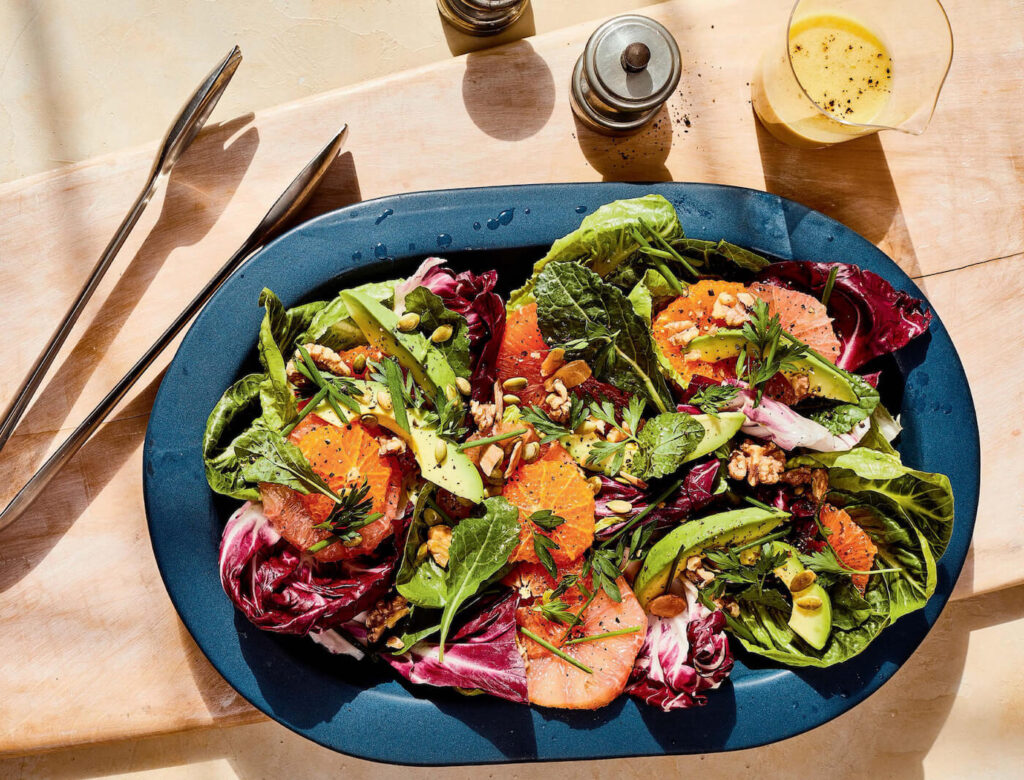
“This is my simple dinner salad and, truth be told, it may be a little different from what you’re expecting. Don’t get me wrong, I love a good garden salad with ranch dressing and maybe bacon bits. But being a California girl, salad for me has always meant greens with whatever fruit is in season—pears, apples, grapes, Cara Cara oranges, clementines—and lots of avocado, crunchy nuts or seeds, whatever herbs I have on hand, a basic vinaigrette, and sometimes a little soft goat cheese crumbled on top. The crunchy, sweet, and bright combination of these items makes the perfect salad for me, and it gets served alongside dinner at least five out of seven nights per week at my house.” —Walker
SERVES 4 TO 6
for the maple-cider vinaigrette:
2 tablespoons pure maple syrup
1½ tablespoons apple cider vinegar
½ tablespoon Dijon mustard
juice of ½ lemon
¼ teaspoon ground coriander
¼ teaspoon ground cinnamon
¼ teaspoon ground cumin
⅛ teaspoon ground turmeric
½ teaspoon fine sea salt
¼ teaspoon freshly ground black pepper
½ cup extra virgin olive oil
for the salad:
8 cups loosely packed mixed greens
1 small head radicchio, leaves torn into bite-size pieces
1½ cups fruit (sliced apples, pears, oranges, and/or figs; halved grapes; or clementine segments)
½ cup toasted nuts and seeds (lightly salted walnuts, almonds, sunflower seeds, toasted pepitas, and/or pecans)
¼ cup chopped fresh flat-leaf parsley, basil, cilantro, chives, or green onions (white and green parts)
2 avocados, halved, pitted, peeled, and diced
¼ cup vinaigrette or Maple-Cider Vinaigrette
1. First, make the Maple-Cider Vinaigrette (if using): In a bowl, whisk together the maple syrup, vinegar, mustard, lemon juice, coriander, cinnamon, cumin, turmeric, salt, and pepper. Slowly drizzle in the oil while whisking vigorously. Use immediately, or transfer to a jar, cap tightly, and store in the fridge for up to 3 weeks. Shake well before using.
2. In a large salad bowl, layer the greens, fruit, nuts and/or seeds, herbs, and avocado. Toss gently to combine. Drizzle with the vinaigrette and toss again to coat. Serve immediately.
Every item on this page was chosen by The Fed & Fit team. The site may earn a commission on some products (read more here).
Red Lentil Soup Recipe
Did you know the lentil is one of the oldest standing legumes and has been providing sustenance and nutrition to humans since prehistoric times? They are humble in nature, but incredibly nutritious and super filling. Loaded with protein, complex carbohydrates, fiber, and a plethora of minerals (like iron, folate, and phosphate), they are a quick-cooking option for adding depth to any meal, including this quick and easy lentil soup.
This red lentil soup is really something special. The aromatics of onion, garlic, ginger, and carrot build the foundation of flavor that enhances the earthy, nutty notes of the red lentil, all engulfed in a rich and creamy broth with just a hint of spice. Optional (but HIGHLY recommended) is to top your soup with a spoonful of crispy, garlic Tarka. The butter-fried garlic adds a little sweetness and a soft crunch that bursts with flavor in your mouth. This soup will warm your tastebuds and your soul, and we hope it finds its way into your regular fall rotation!
Red Lentil Soup Ingredients
3 tablespoons coconut oil (or extra virgin olive oil)
1 onion, diced
2 garlic cloves, finely chopped
2-inch piece of fresh ginger (or 2 ½ teaspoon of dried ginger), grated
2 large carrots (or 3-4 small carrots), coined
1 ¼ teaspoon cumin
2 teaspoon of curry powder
2 ½ cups of chicken broth
1 14.5-ounce can of crushed tomatoes
1 13.5-ounce-can of full-fat coconut milk
1 cup of red lentils
1 teaspoon of salt
Pinch of cayenne
Chopped cilantro (about ¼ cup)
Juice of 1 lime
Optional Garnishes
Feel free to pick and choose garnishes as you’d like! The garlic Tarka is more involved but really, really delicious.
Garlic Tarka: ⅓ cup of ghee or extra-virgin olive oil + 12 garlic cloves, peeled and minced
Plain full-fat yogurt
Drizzle of olive oil
Lemon juice
Fresh parsley
How to make Red Lentil Soup (Stovetop)
For how bold and delicious this soup is, the process is pretty easy! Here’s how you’ll do it:
Saute the onions – heat coconut oil in a large pot over medium. Once the oil is warm, add the onions and saute until translucent, about 4 minutes, stirring occasionally.
Add the garlic, ginger, and spices – add garlic, ginger, and carrots and saute for 1 minute. Then add spices to coat the vegetables.
Add the rest of the ingredients and cover – add broth, coconut milk (reserving 1/4 cup for garnish), crushed tomatoes, salt and lentils. Bring the soup to a low boil, reduce to medium-low, cover the pot and simmer gently until the lentils are tender, but not mushy, 20-25 minutes.
To make the optional garlic Tarka – in a small pot or skillet, melt the ghee over medium-low heat. Add the garlic and cook, stirring occasionally, for 4 to 5 minutes, until the garlic is golden brown (do not let it burn).
Garnish and enjoy – garnish with a drizzle of the garlic Tarka (optional), a ¼ cup of coconut milk, a pinch of cayenne, chopped cilantro, and a squeeze of lime.
What to Serve with Red Lentil Soup
This soup is delicious alongside naan or any other flatbread. If you’re looking for a veggie accompaniment, this simple arugula salad pairs beautifully too!
Storing Red Lentil Soup
Store your leftover lentil soup in an airtight container in the refrigerator (for up to 5 days) or freezer (for up to 3 months). Let the soup thaw in the fridge overnight (if frozen), and then reheat on the stove or in the microwave until warmed through!
FAQ for Red Lentil Soup
Q
Do red lentils have to be soaked before cooking?
A
This recipe does not call for soaking the lentils ahead of time. They’ll head straight into the pot with the broth, coconut milk, and crushed tomatoes, and simmer until cooked!
Q
Do you need to pre cook lentils for soup?
A
You don’t! The dry lentils will go into the pot as is!
Q
What does red lentil soup taste like?
A
This red lentil soup is bold and super flavorful. The curry powder gives it a delicious Indian-inspired flare.
Q
What can I add to red lentil soup?
A
We recommend garnishing your soup with garlic Tarka, coconut milk, cayenne, cilantro, and a squeeze of lime. Alternatively, a dollop of plain full-fat yogurt, a drizzle of olive oil, a squeeze of lemon, or fresh chopped parsley would also be delicious.
Nutiva Organic Unrefined Virgin Coconut Oil
Shop Now
Red Lentil Soup
By: Lindsay Bare
Prep Time: 10mins
Cook Time: 30mins
Servings: 4Servings
For the Garlic Tarka (Optional)
Heat coconut oil in a large pot over medium. Once the oil is warm, add the onions and saute until translucent, about 4 minutes, stirring occasionally.
Add garlic, ginger, and carrots and saute for 1 minute. Then add spices to coat the vegetables.
Add broth, coconut milk (reserving 1/4 cup for garnish), crushed tomatoes, salt and lentils. Bring the soup to a low boil, reduce to medium-low, cover the pot and simmer gently until the lentils are tender, but not mushy, 20-25 minutes.
If you’re making the garlic Tarka: in a small pot or skillet, melt the ghee over medium-low heat. Add the garlic and cook, stirring occasionally, for 4 to 5 minutes, until the garlic is golden brown (do not let it burn).
Garnish with a drizzle of the garlic Tarka (optional), a ¼ cup of coconut milk, a pinch of cayenne, chopped cilantro, and a squeeze of lime.
Nutrition Facts
Red Lentil Soup
Amount per Serving
% Daily Value*
* Percent Daily Values are based on a 2000 calorie diet.
The nutrition facts are per serving and do not include the optional Garlic Tarka.
If you’re enjoying this as an appetizer or side, it’ll serve 6-8.
Optional Garnishes:
Garlic Tarka: ⅓ cup of ghee or extra-virgin olive oil + 12 garlic cloves, peeled and minced
I love soup weather. From tomato soup to this roasted red pepper soup, I can’t get enough. A delicious soup makes a great weeknight meal and they’re perfect to reheat on busy days. Here’s my recipe for how to make a flavorful red pepper soup that’s naturally gluten-free and dairy optional.
Roasted Red Pepper Soup Ingredients
There are a lot of reasons to love this soup. It’s packed with healthy veggies, which is always a plus in my book. Peppers are really high in vitamin C, which is also great for cold and flu season. The garlic and onion not only add flavor, but they’re also good for fending off the sniffles this time of year.
I use nutrient-dense chicken stock here, but vegetable stock will also work if it’s what you have on hand.
The recipe includes instructions for how to easily roast your own peppers in the oven. If the weather is warm enough outside, you can also throw them on the grill for a grilled pepper flavor. When I’m running a little short on time, sometimes I’ll use jarred roasted red peppers instead. You can usually find them in glass jars at the local grocery store.
Soup Toppings
A creamy soup is the perfect vehicle for toppings. Instead of crusty bread or croutons though, our family prefers a dollop of sour cream. You could also add some fresh, chopped herbs like basil or oregano or a dash of black pepper. A drizzle of heavy cream or extra virgin olive oil is also a nice way to top it off.
Make it a Meal
Since it’s packed with veggies I like this as a side dish, but you could easily turn it into the main course if you want. Add a little chicken or Italian sausage to the soup after blending for some more protein. This is a great way to use up leftover chicken from the day before too.
Tips for Making the Soup
The process is simple enough, but here are a few tips for getting the perfect roasted red pepper soup.
Don’t overcrowd the baking sheet when roasting the peppers and tomatoes. If they’re overlapping and squished together they tend to steam instead of getting a nice, crispy skin on them.
Don’t overfill the blender (if using one). I like using my immersion blender for this recipe, but a regular blender will also work. Just be sure not to fill it more than halfway at a time with the hot soup or you’ll have a hot (and dangerous!) mess.
Make extra for later. This soup tastes even better after the flavors have had more time to meld. It also freezes well.
Adjust the level of spice. It has a mild kick to it, but if your family doesn’t like spicy food then omit the red pepper flakes if desired. Or if you can’t get enough of the heat, then add some more!
Roasted Red Pepper Soup Recipe
Katie Wells
A simple and flavorful recipe for pureed roasted red pepper soup with tomatoes, garlic, basil, and a sprinkle of red pepper flakes for heat.
Prep Time 10mins
Cook Time 23mins
Total Time 33mins
Course Dinner, Lunch
Cuisine American
Servings 8
Calories 131kcal
Instructions
Preheat the oven to 425°F.
Halve the red peppers and remove the stems and seeds.
Place the bell pepper and tomatoes, cut side down, on a large baking sheet.
Place the garlic cloves in between the peppers and tomatoes wherever there is room.
Place the baking sheet in the preheated oven and roast for 20 minutes.
Use the broiler to cook for an additional 3 minutes to get a little charring on the skin of the vegetables.
In a large pot on the stovetop, heat the oil over medium heat.
Saute the onion and carrot until slightly softened.
Add the white wine and simmer for 5 minutes.
Add the broth, Italian seasoning, red pepper flakes, and salt.
Simmer over low heat, stirring occasionally until the peppers and tomatoes have finished cooking.
Add the roasted peppers, tomatoes, and garlic to the pot on the stove.
Using an immersion blender (or working in batches in a blender), puree the soup until smooth.
Serve with a spoonful of sour cream and/or garnish with fresh basil if desired.
Notes
Make this soup into a heartier meal by adding leftover cooked chicken or Italian sausage.
Store any leftovers in an airtight container in the fridge.
This Romanian Bean Soup with Smoked Meat and Tarragon (Ciorbă de Fasole cu Afumătură și Tarhon) is hearty, comforting and delicious. As with most recipes in Romania, every household puts their own little spin on it. This version is courtesy of my in-laws who live in Brașov, a city nestled in the Carpathian mountains in the Transylvanian region of Romania.
What You Need for Romanian Bean Soup with Smoked Meat
Smoked Meat: The main flavour of this soup comes from smoked meat (AKA afumătură in Romanian). Smoked pork knuckle (ciolan) is most often used, but you can substitute just about any kind of smoked meat you like, such as smoked pork ribs or smoked sausage. My mother-in-law likes to use smoked turkey legs and wings, which still gives you a delicious smoky flavour and aroma, but a less greasy finished product.
Beans: It wouldn’t be a bean soup without the beans! For sake of time and convenience, my in-laws like to use canned white beans in this soup. They make for a softer and creamier finished product, which I tend to prefer. You can use any kind of white bean you like, such as white kidney or cannelinni.
Dried, white beans, specifically fasole de boabe, are more commonly used in Romania. Keep in mind that if you use dried beans, you will need to soak them in water overnight and then boil them several times before adding them to the soup.
Vegetables: This soup is loaded with a combination of onion, carrot, parsley root, celery root, and bell pepper. The thing that most Romanian soups have in common is that the vegetables are almost never sautéed, but rather are boiled.
Fresh Herbs: Thyme, parsley and tarragon really bring this Romanian bean soup to life. Fresh will give you the best aroma and flavour, but you can substitute dried if that’s what is available to you. If you use dried herbs, use approximately half the amount listed for fresh.
The tarragon (tarhon) in particular adds a very pronounced flavour and aroma to the dish. It has the ability to overpower some of the other flavours in the soup, specifically the smokiness from the meat, so add a little at a time until you reach your preferred amount.
Garlic: Adding lots of finely chopped garlic a few minutes before the soup is finished cooking will kick the flavours up a couple notches and compliment the smoky flavours.
Sliced Red Onion: This soup is customarily served at the table with some thinly sliced red onion. Like the garlic, it helps cut through the richness of the smoked meat – especially if using smoked pork knuckle.
28ozcanned white kidney beanssubstitute cannellini beans
1tablespoontomato paste
4clovesgarlicfinely chopped
3tablespoonsfinely chopped fresh tarragon
2tablespoonsfinely chopped fresh parsley
Kosher salt and black pepper to taste
1small red onionthinly sliced, for garnish
Instructions
Rinse the smoked turkey and add it to a large stock pot with 5 quarts of cold water. Set over high heat, bring to a boil, cover partially with a lid and cook until the meat is tender and starts to fall away from the bone, around 1.5 hours. Reserving the cooking liquid, transfer the turkey to a bowl, let cool to the touch, separate the meat from the bone and roughly chop the meat. Set aside.
Reduce the heat to medium-low or a gentle simmer and add the white onion, carrot, bell pepper, celery root, parsley root and thyme. If necessary, add more water to the pot for a total of 5 quarts. Cover partially with a lid and cook, stirring occasionally, until the vegetables have slightly softened, around 15 minutes. Add the beans, tomato paste, reserved shredded turkey meat and bones, and cook, stirring occasionally, until the vegetables are soft and fork-tender, around 10 minutes. Add the garlic, tarragon, and half the parsley. Cook for 2 minutes, taste for seasoning and adjust with salt and pepper as desired.
For best flavour, let the soup sit for at least 30 minutes before serving in individual bowls garnished with parsley and red onion on the side.
Sometimes you just need something a little sweet, right!? Well, I’ve got a treat for you! These wholesome and healthy Coconut Blueberry Wholemeal Muffins are full of coconutty goodness and loaded with nutritious blueberries.
Our family’s favorite dill pickles! Packed with garlic and fresh dill, these crisp dill pickles will add a boost of flavor to any meal. This Czech recipe has been passed down through our family for generations.
This refreshing iced ginger lemonade packs a lot of punch in flavor and health benefits. Made wholesome ingredients like fresh ginger, lemon and raw honey. Enjoy iced or you can even enjoy warm during the fall and winter months. Paleo, gluten-free and refined-sugar-free.
This unique pie crust technique brakes all the traditional pie-crust-making rules, but it makes the flakiest pie crust ever, and you don’t need any special equipment!
This Instant Pot wild rice soup is loaded with protein and vegetables, and it is so easy to make. It is a delicious and comforting dish that is perfect for meal prep!
Finally! Vegan meatballs that are also low-carb! These little plant-based balls of yum are keto-friendly, gluten-free and have a perfect meat-replacing texture. Packed with flavour and nutrients, they’re sure to be a huge hit with the whole family!
Soft and chewy Vegan Snickers Cookies studded with dates and peanuts and smothered with chocolate ganache! These are made with almond flour and tapioca flour and therefore gluten-free and grain-free ! They are not too sweet but such a satisfying treat along with a cup of coffee. Peanut-free version included.
Good news: You are only about 20 minutes away from having a plate of these addictive chocolate-covered Vegan Snickers Cookies on your kitchen counter! We all deserve a cookie or two, am I right? Let’s make it two! Did I mention these are gluten-free?
These are studded with sticky sweet chopped dates and crunchy peanuts! That’s right, no caramel, no peanut butter needed here! If Snickers are your thing, you will adore these glutenfree almond flour cookies.
We use a blend of almond flour and tapioca flour for these vegan snickers cookies! Almond flour gives these the perfect chew while tapioca starch helps bind and gives these the perfect crisp-outside texture.
These have All of the amazing flavor of snickers bars in cookie form. Dates get baked into sweet caramelly bits. Peanuts in the cookie dough add a fabulous crunch. You can also add more peanuts on top of the chocolate topping. The baked cookies are dipped in melted chocolate that makes them the perfect snickers cookie bites!
Soft and chewy Snickers Cookies studded with dates and peanuts and smothered with chocolate ganache! These are made with almond flour and tapioca flour and therefore gluten-free! They are not too sweet but such a satisfying treat along with a cup of coffee! Peanut-free version included.
Prep Time15mins
Cook Time12mins
Chill time15mins
Total Time42mins
Course: Dessert, Snack
Cuisine: American
Keyword: glutenfree snickers cookies, Snickers cookies almond flour, vegan snickers cookies
Servings: 10
Calories: 198kcal
Author: Vegan Richa
Ingredients
1cup(112g)almond flour(blanched superfine preferable. Natural also works)
6soft dateschopped in small pieces, use 7-8 if smaller dates
2tablespoonschopped roasted unsalted peanuts
1tablespoonsemi solid refined coconut oil
3-4tablespoonsmaple syrup
To top
½cup(90g)vegan semi sweet chocolate chips or chopped vegan chocolate bar
1teaspooncoconut oilor use 1 Tablespoon peanut butter
Instructions
In a bowl add all the dry ingredients. That’s almond flour, tapioca starch, baking soda, salt cinnamon, powdered sugar. Mix really well. Press to break all the almond flour lumps. Add the dates and peanuts and mix in.
Melt your coconut oil and add that and 3 tablespoons of maple syrup to the bowl. If you like you can also add a few drops of vanilla extract. Then mix everything really well. If the mixture isn’t coming together as a soft dough, add in maple syrup one teaspoon at a time to bring the dough together.
You want a really soft slightly sticky, and not dry dough. so a little extra maple syrup is okay.
Let the mix sit for 5 minutes. Meanwhile, preheat the oven to 335F( 170 c), line your baking sheet with parchment paper.
Using a scoop or your hands, take about 2 to 2 ½ tablespoons of the mixture and make into a flat disk, press onto the baking sheet.
Repeat for all the cookies, you’ll get 9-10 cookies. Keep them at least 1.5 inch apart as the cookies do spread a lot.
Put the baking sheet in the oven and bake for 10-12 minutes or until the edges are golden brown. Remove the baking sheet from the oven; let the cookies cool on the baking sheet for 10 to 15 minutes.
Meanwhile, melt your chocolate and coconut oil in a double boiler or the microwave. (Microwave it for 30 seconds then microwave again in 15-second batches until the chocolate starts to melt a little bit then start whisking it and whisk for 30 seconds or until is evenly melted.)
Once the cookies are cool to touch, pick a cookie and dip the tops in the melted chocolate and set aside for the chocolate to set. (Or you can also just drizzle the chocolate on the tops of the cookies and make designs of choice. You can also add more chopped peanuts on top of the chocolate).
Chill the cookies for 15 mins in the fridge to set the chocolate and enjoy!Store on the counter for the day. Refrigerate for upto a week.
Notes
To make these peanut free, you can use chopped up cashews or almonds instead. To make these Oilfree: omit the oil and use 2-3 teaspoons more maple syrup. If making them Oilfree, use blanched almond flour and not natural Nutfree: make my other regular or gluten-free cookies and add dates, peanuts to the dough and dip baked cookies in melted chocolate
Nutrition
Nutrition Facts
Vegan Snickers Cookies
Amount Per Serving
Calories 198 Calories from Fat 117
% Daily Value*
Fat 13g20%
Saturated Fat 5g31%
Sodium 86mg4%
Potassium 124mg4%
Carbohydrates 19g6%
Fiber 3g13%
Sugar 12g13%
Protein 4g8%
Vitamin A 7IU0%
Vitamin C 0.02mg0%
Calcium 42mg4%
Iron 1mg6%
* Percent Daily Values are based on a 2000 calorie diet.
Ingredients:
these gluten-free cookies are made with a blend of almond flour and tapioca starch
baking soda gives these a bit of a rise
salt brings out the sweetness
I like to add some cinnamon to these
the cookie dough is sweetened with sugar and maple syrup
coconut oil is added as a fat
that “snickers” feel is achieved by adding chopped dates instead of caramel and of course peanuts
the chocolate ganache is made with using a mix of coconut oil and chocolate
Tips:
To make these peanut free, you can use chopped-up cashews or almonds instead.
baked goods with almond flour burn quickly so don’t leave these out of sight and don’t bake them at a higher temperature than recommended.
Almond flour can often usually be replaced successfully with raw cashew flour or sunflower seed flour but the latter has a bit of a greenish tint which might look a bit less pleasing. For Nutfree: make my other regular or gluten-free cookies and add dates, peanuts to the dough and dip in melted chocolate
How to make Gluten-free Snickers Cookies
In a bowl add all the dry ingredients. That’s almond flour, tapioca starch, baking soda, salt cinnamon, and powdered sugar. Mix really well and press to break all the almond flour lumps.
Add the dates and peanuts and mix in.
Melt your coconut oil and add that and 3 tablespoons of maple syrup to the bowl. If you like you can also add a few drops of vanilla extract.
Then mix everything really well. If the mixture isn’t coming together as a soft dough, add in maple syrup one teaspoon at a time to bring the dough together.
You want a really soft, not dry dough so a little extra maple syrup is okay.
Let the mix sit for 5 minutes. Meanwhile, preheat the oven to 335F( 170 c), and line your baking sheet with parchment paper.
Using a scoop or your hands, take about 2 to 2 ½ tablespoons of the mixture and make into a flat disk, press onto the baking sheet.
Repeat for all the cookies, you’ll get 9-10 cookies. Keep them at least 1 inch apart as the cookies do spread a lot.
Put the baking sheet in the oven and bake for 10-12 minutes or until the edges are golden brown. Remove the baking sheet from the oven; let the cookies cool on the baking sheet for 10 minutes.
Meanwhile melt your chocolate and coconut oil in a double boiler or the microwave. ( microwave it for 30 seconds then microwave again in 15-second batches until the chocolate starts to melt a little bit. Then whisk it for 30 seconds or until is evenly melted.)
Once the cookies are cool to touch, pick a cookie and dip the tops in the melted chocolate and set aside for the chocolate to set. Or you can also just drizzle the chocolate on the cookies and make designs of choice. Chill the cookies for 15 mins to set the chocolate and enjoy!
Storage:
Store on the counter for the day. Refrigerate for upto a week.